
When opening a online store in PrestaShop It is necessary to take into account certain important details in order to make the most of this platform.
For example, a very important aspect in this regard has to do with know how to export products in PrestaShop, action that is necessary to carry out to be able to make a backup copy, or also in order to migrate all the products to another online store, etc.
These cases provide us with an example of why it is so necessary to know the procedure to export all the products of an online store made in PrestaShop to a CSV file. Next we are going to mention the steps and instructions of this procedure, in order that users can execute it without too many complications.
To begin with, it should be noted that PrestaShop has an export button that is just above the list of products (in Catalog> Products), which would seem to be enough to solve the question about the export of the articles.
However, this button does not export all the product data, as it omits a number of important details, such as: item descriptions, combinations, brands, etc.
Therefore, another procedure must be carried out to include these elements, a process that we will review from a store PrestaShop 1.6 or .11 and higher.
The importance of modules in Prestashop
One of the main tools that can be used in the Prestashop electronic platform, It has to do with the installation of modules, which are a series of instruments that we can use to make our web store more specific and recognizable among the user community, who may be interested in what we offer on said website.
This is where the primary function of Prestashop modules.
For example, these work to be able to create additional display options, such as blogs, some specific information or certain security additions.
Likewise, they also allow us to connect with other services (which may represent different forms of payment to make it easier for buyers to pay invoices) or some other important functions, such as: point systems for customers or display of reviews for articles.
In consecuense, the module system that can be applied from the Prestashop platform, makes it possible for each store on this site to be specialized and contain everything the customer needs without filling it with features that are not of interest to buyers.
Create the CSV file
The first step should consist of creating a CSV file with all the data that is required to be able to import the products into another PrestaShop installation, a process that is carried out as follows:
First you have to add the file (AdminProductsController.php) in the following PrestaShop installation path of the user, and then overwrite the AdminProductsController.
/ override / controllers / admin /
What happens when the file already exists in the directory the user is going to?
When the file already exists in the directory to which one is going, this can happen because it is possible that the template has already created that file to overwrite the AdminProductsController.php.
In case of this situation, what should be done next is to add said content just before the closing of the PHP tag (?>).
Likewise, it is also recommended to make a backup copy of this file before editing it, which can be very useful in case the procedure does not work, because in this way you have a backup to try again without complicating your life. that this way you have the original file to restore it whenever you need it.
Installation of the module to export files in PrestaShop
Another way to carry out the export of files in PrestaShop can be the following:
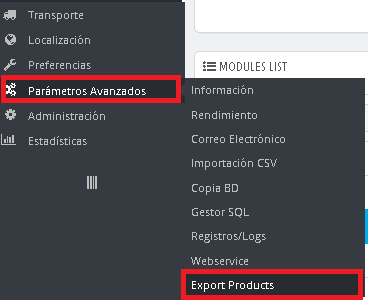
First, the installation of the module is carried out, which in this example would be for PrestaShop version 1.6. The installation is very simple, you will only enter the modules tab, where you can access its configuration. Once this is done, a menu will open with different configuration options.
In this section you must enter the option to Advanced Parameters, which in turn will open more options and later the one of Export Products. Basically, this is the first step to be able to access the configuration of the product exporter module in PrestaShop.
How to install a module in Prestashop?
Fundamentally, there are two main types of modules that are classified according to the type of installation to which they correspond.
- The first one is the automatic installation, from the "Addons.prestashop.com" You can download it here
- The second type of modules corresponds to those that can be installed manually.
Automatic installation
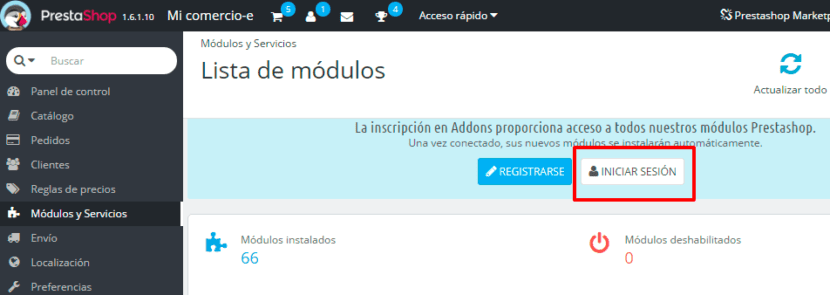
In the event that it has been purchased officially in the Prestashop Market Place Spanish store, the modules can be activated easily from the back office, which consists of the store administration panel.
In this way, it is only necessary to enter the section of "Modules and Services”From the administration panel menu, and then enter the registered data in the Prestashop Addons page.
Once this procedure is done, we can see the list of available modules, along with the install button to add them to the store.
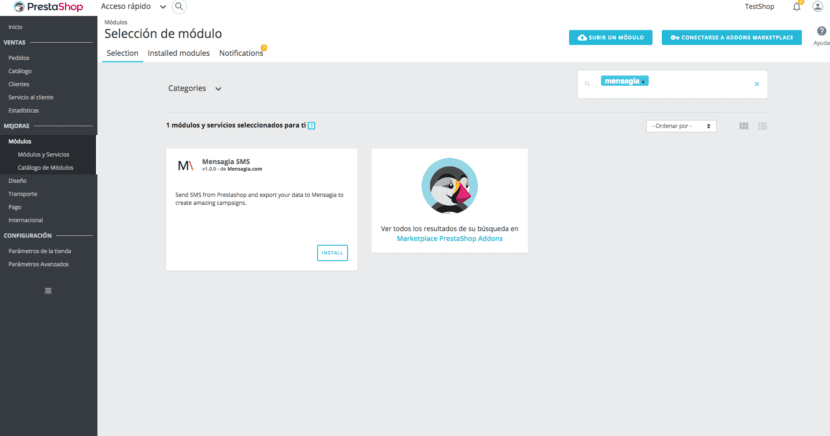
Manual module installation
To perform a manual installation of the module without using the system installer itself, in need to upload the file folder by ftp that previously will already be unzipped in the folder of "modules”From our Prestashop.
Another method instead of using an ftp account is by using the cPanel files, like the one offered in our Prestashop Hosting. The following will be to upload the file that must still be compressed to the “modules” folder and then unzip it with the right button, as shown in the following image:
After the module is uploaded and unzipped, we can go to the section "Modules and Services in Prestashop”, And there we will put the name of the module that will appear in the respective list, available now for us to add it with a simple click.

Type of Modules in Prestashop
There is a great variety of Modules that can be used and applied in Prestashop interface to add better features and functionality to our online store with prestashop.
Some of the most important are listed below:
- The Analytics and Banners Modules
- Affiliates
- Shipments (MRW, DHL, Envialia, SEUR, etc)
- Payment gateways (CECA, Banco Sabadell, Redsys, Cash on delivery, PayPal, etc.)
- Modules for Blogs
- Modules for Social Networks
Module for Prestashop 1.6
Another way to carry out file export in PrestaShop it can be the following:
First, the installation of the module is carried out, which in this example it would be the module for PrestaShop version 1.6. Installation is very simple, you will only enter the modules tab, where you can access its configuration.
Once this is done, a menu with different configuration options will open.
In this section you must enter the option to Advanced Parameters, which in turn will open more options and later the one of Export Products. Basically, this is the first step to be able to access the configuration of the product exporter module in PrestaShop.
Product exporter configuration options in PrestaShop
Once the configuration screen of the module has been opened, we will find different configuration options of the exporter of products in PrestaShop, At this point, the following changes and applications can be selected to carry out the configuration:
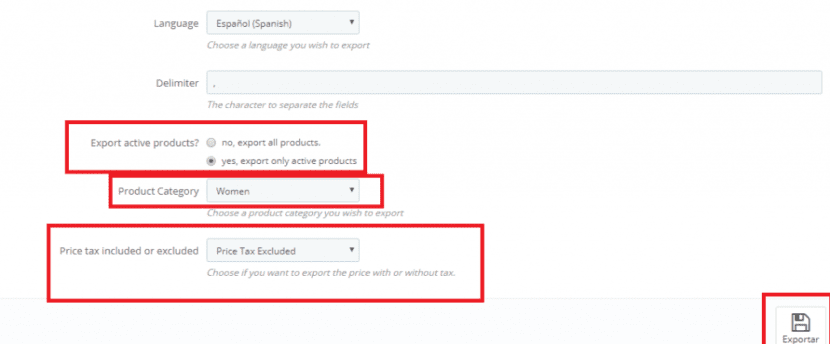
You can select the language in which you want to export the products, using the option Language This is a very practical option that makes the configuration process much easier for us, since many vendors are not completely familiar with the use of English or other languages, which is why it is very convenient to program the configuration in Spanish.
Product exporter configuration options in PrestaShop
Once the configuration screen of the module has been opened, we will find different configuration options of the exporter of products in PrestaShop.
At this point, the following changes and applications can be selected to carry out the configuration:
You can select the language in which you want to export the products, using the option Language This is a very practical option that makes the configuration process much easier for us, since many vendors are not completely familiar with the use of English or other languages, which is why it is very convenient to program the configuration in Spanish.
You can select the delimiter that we want to use in the export, using the option delimiter.
It will also be possible to indicate if what you want is to export all the products or if, on the other hand, you only want to export those that are active, an option available from two categories that emerge from the button Export active products?
Subsequently, you must indicate if you want to export the products of all categories or only of a specific category, in the available option of ProductCategory.
Finally, you can also modify the option that will indicate whether the price with or without taxes will be included in the export, which is represented in the category of Price tax included or excluded.
Below is the screen where these options are displayed to detail the terms and characteristics of the export.

Many of the final elements with which it is used depend on this customization. they will export the products in PrestaShop. Below is an example of how an export is carried out according to a specific product category.
For example, products of the “Women” category will be exported, in which only active products will be selected, and the export will be carried out with the “tax-free” price. This configuration would be illustrated as follows:
Finally, once the pertinent settings have been selected, press the button Export, which generates a CSV file with the information of the exported products.
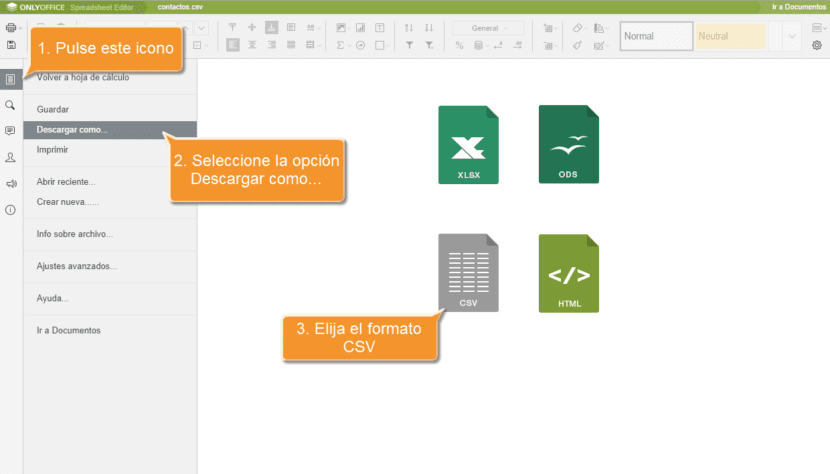
Module to export products in CSV format in PrestaShop
Now we will review the instructions to be able to export products in PrestaShop that are inserted in the store in CSV format.
As seen above, in the configuration of the module you can establish if you want to export by a certain category, that is, if you want to export the products in a specific language, the delimitation or the type of products you want export, etc.
It should be noted that the export is done by default in CSV, but it also allows you to select said export in another format, for example in TXT. The following image shows these options that are available to configure.

MySQL and problems exporting in CSV format
One of the drawbacks that CSV export can have in PrestaShop is the fact that you may need to know mysql, Well, all the queries are made from this system, which is quite logical considering the fact that the PrestaShop database is in MySQL.
Before exporting via mysql, It is possible to test if the options established by default serve us, or if, on the other hand, it is necessary to modify them to carry out this procedure. In this way, if the data tables are observed, in many of these, whether they are products, categories or attributes, etc., a series of buttons appear that will allow us to carry out the following processes:
- Export button: This button allows the data of the displayed table to be exported directly to a CSV, only it has the disadvantage that it is not a complete export of all possible data, since it can export a table of products, but without the description of each product.
- Show SQL query button: This option shows us the SQL query that will be executed when the export button is clicked.
- Export button to SQL Manager: This button allows you to export the query that is executed when you press the option to show SQL query to the SQL manager.
In several cases, these options may be insufficient to take advantage of all the export features, so it is necessary to work in an advanced way in the SQL manager. In version 1.6 of PrestaShop, the SQL manager can be found in "Advanced Parameters + SQL Manager" and in version 1.7, it can be found in "Advanced Parameters + Database + SQL Manager".
What is the SQL Manager for
Basically, the SQL manager is a database manager with which you can make queries of these and save them to execute it when you want. By running these queries, you can download a CSV file that results after the execution is finished.
To perform a query within the SQL manager, you just have to press the button "Add a new SQL query". Doing so will open the following box:
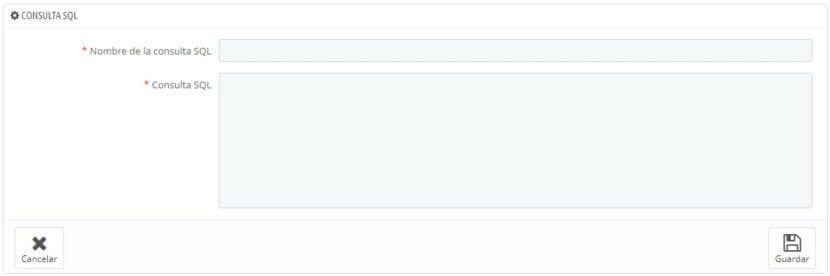
Thanks to PrestaShop It shows us the tables and attributes of the databases, this allows us to add these elements directly to the query, as shown in the following image:
Conclusion
As you can guess, the best thing to do to properly handle these processes is practice, because only in this way will the skill be achieved to export products in PrestaShop as an expert.
The limits of the export will depend from this point, on the management and the skill of the users.