
To find out how configure PayPal in PrestaShopWe will first talk about the two concepts. For those who do not know what it is about, PayPal consists of an online payment system for virtual stores. Through this page you can make a payment instantly when buying a product in an online store.
Currently, PayPal is one of the most popular and most used online payment systems on the marketThis is due to its great ease of use and the flexibility it presents so that we can use it as a digital payment method, above other traditional means such as credit cards.
Y PrestaShop is a major free ecommerce software, by means of which its users can establish online stores in a very simple and effective way, eliminating all kinds of technical and financial obstacles that are generally required for this type of business.
PrestaShop has been operating successfully since 2007, to become today a world-renowned e-commerce solution, with more than 165,000 online stores around the world.
How to configure PayPal in PrestaShop?
In the following introduction, we will observe the steps to follow to perform the PayPal configuration in the most current versions of PrestaShop, version 1.6 released in March 2014 and version 1.7 released in November 2016.
Set up PayPal in PrestaShop 1.6
To perform the PayPal PrestaShop module configuration it is important that by then we have created the PayPal account, which is essential to continue with the process of configuration of the module for payment with PayPal in PrestaShop.
Next we are going to detail the main steps to be able to configure Paypal in PrestaShop
Is six easy steps that will allow us to carry out this procedure quickly and without major complications.
Paypal account:
As mentioned above, having a PayPal account already created will be the first fundamental step to configure with PrestaShop. Just above the first point of the configuration bar, we can see the question: Do you already have a PayPal Business account?
To this questioning we must respond positivelyWell, by then we must cover this requirement without problem.
API signature:
The next step has to do with the Obtaining the API Signature, where we will go directly to the third point of the configuration bar, which is titled "Activate your online store to accept PayPal payments".
A little further down we can also see an orange bar called "Get my PayPal identification details«, In which we will click to continue with the procedure and go to the third step of this guide.
In the following image we can observe in detail the third point of the PayPal configuration page, where you can also see the orange button that we must click to continue.
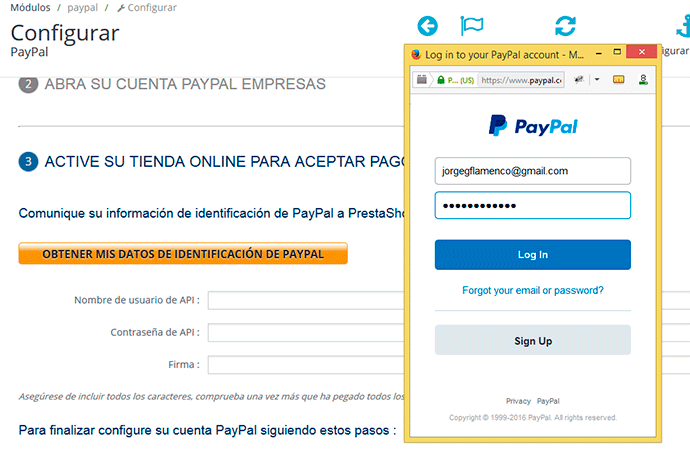
Login to PayPal:
After having given click the orange button, a window will appear in which we will be asked log in to PayPal, just as can also be seen in the previous image.
We will have Log In Only by entering the email and password that has been created for the PayPal business account.
Once the data has been entered, we will only have to access by pressing the "Log In" button, with which we will have advanced to the next step of this explanation.
API credentials:
In order to process the payments in the online store, It is very important that we have the API credentials, which we can request in the configuration of API credentials and permissions, which is part of the second option of API Access, as we can see expressed in the following image:
As can be seen, this option can be applied to personalized websites and internet stores, as well as shopping carts pre-integrated on your own server. Likewise, as indicated in said image, we must select the access link of option 2, which is called "Request API credentials."

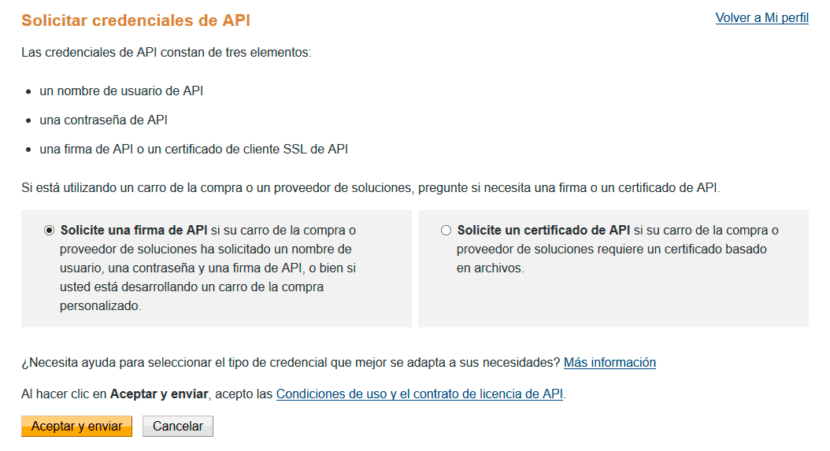
Request an API signature:
Subsequently, once the API credentials, The page where said request is carried out will be opened, in which it will be indicated that the API credentials consist of three main elements:
- An API username
- An API password
- An API signature or API SSL client certificate
On this new page, just as you can see in the following image, we will be presented with two different options: “Request an API signature” and “Request an API Certificate”.
In this case, we must mark the first option, which allows us to request the API signature. Once this box is selected, we just have to accept and send to continue with the process.
The following image details the information provided in this step of the guide.
API name and password and signature:
As part of the sixth step, after request API signature, A screen will appear with the following information:
- Credential:
- API username:
- API password:
- Company:
- Application date:
On one side of each of these sections, we can press the "Show" button so that the information of each data is displayed, which will be very important to perform the next and last procedure of this PayPal configuration guide in PrestaShop.
Next, we can see in the following image what was explained previously.
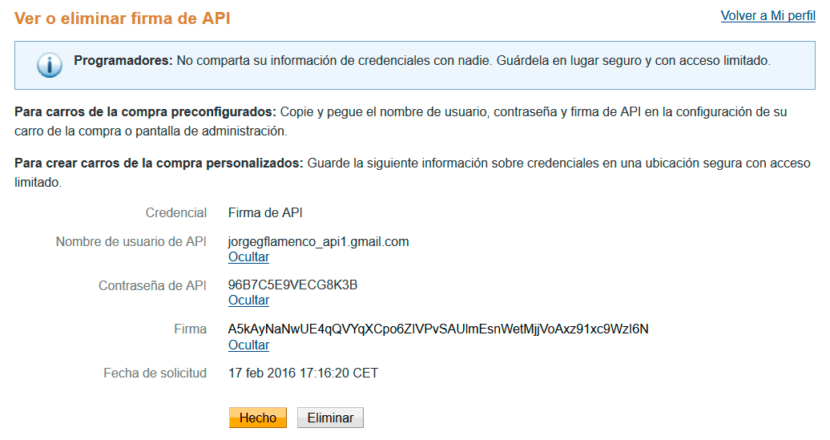
As indicated a moment ago, in order to see the information of the data that is displayed on this page, we only have to give click the "Show" button, which will make the respective information visible in the form of codes in some cases.
Said data must be copied and pasted in the appropriate field of the third point of the module configuration page, which we were able to review previously in the third step of this guide.
Then, in the following image we will see that point, already with the Signature information filled in with the information obtained at the beginning of the sixth step of our guide.

As already indicated, in this part it will only be necessary to paste the respective information in the indicated part of "Signature". The other configuration options will be left as they are, and then we can click on the save button that is located at the bottom of the page.
With this we will have concluded the configuration of the PayPal module in Prestashop, in version 1.6.
Set up PayPal in Prestashop 1.7
PayPal module installation in PrestaShop 1.7.
Depending on the version of Prestashop 1.7 that we handle, we may not have the Paypal module installed. Therefore below we have two different scenarios.
- A) PayPal module installed:
To verify that we already have the PayPal module installed, we can go to the "CUSTOMIZE" tab, where we will enter "Modules", then "Modules and services", and finally we click on the "Installed modules" tab.
Later, we can quickly search for the PayPal module by pressing the CTRL + F key and typing paypal in the search box. So we can check if we already have the module installed, and if so, just click on the word "Configure"
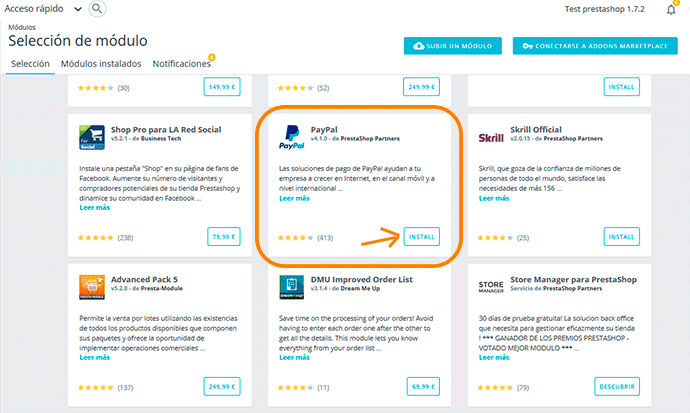
- B) PayPal module not installed:
In case PayPal does not appear in the "Installed modules" tab, that means that it will need to be installed. To carry out the installation, we will start by performing the same procedure as for your search.
First, we will enter the "CUSTOMIZE" tab, then "Modules", and from there to "Modules and services", and then click on the "Selection" tab. We will look for the "PayPal" module, which we will enter through the "Install" button.
In the following image we can see this step:
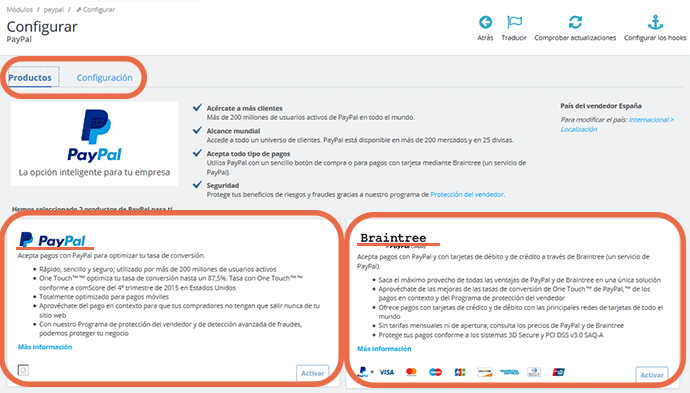
PayPal module interface in PrestaShop 1.7
Now that we can access the configuration of the PayPal module, we can see two tabs: ´Products ”and“ Configuration ”.
Likewise, we can also observe two different options to configure: "Paypal" and "Braintree". Of these two, we are going to select the option "Paypal" which is the one that interests us. To activate and configure standard PayPal.
In the following image we can see this step:
Configuration of the PayPal module in Prestashop 1.7
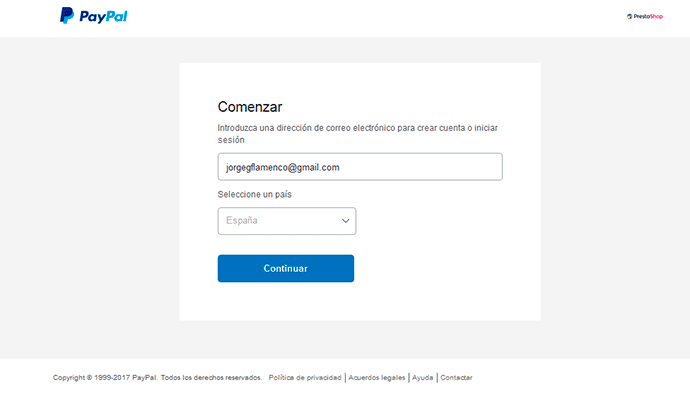
To make the configuration, we will only have to do click on the "Activate" button, which appears in the rectangle on the left, the one that is dedicated to PayPal and that will give us access to the PayPal page, where only we must enter our email to create an account, or sign in to a PayPal account already created previously, and once this is done, we will select the country of origin that is located in the selector located below, and then we will click on the continue button.
Afterwards, an image will appear that is a warning to authorize the application to use of our API keys and thus be able to integrate with PayPal.
To continue with the process we have to give authorization, using the button "Yes, I give my permission.", whether it occurs in either of the following two cases:

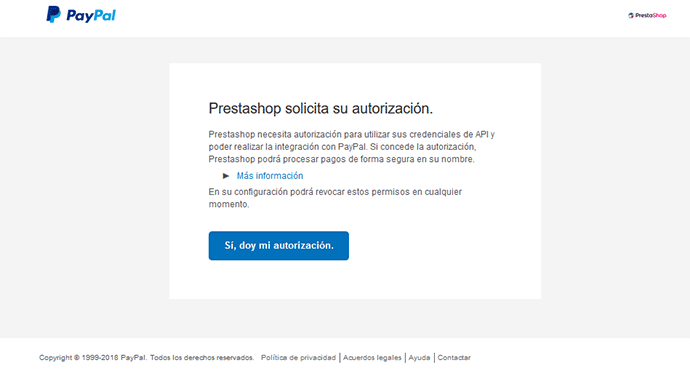
After accepting, another window will open that will not indicate that the authorization was successful.

Then the next step will be go back to the configuration of the PayPal module of our PrestaShop installation, using the button "Return to PrestaShop or also "Return to 202 e-commerce", after which a text will appear where we will confirm that we have correctly connected PayPal with Prestashop, as well as a series of indications to confirm the email address and know if there are rounding errors in the orders.
Configuration of the PayPal module in PrestaShop
After connecting the PrestaShop 1.7 PayPal module with PayPal account, we will access in the tab "Configuration" of the PayPal module, where we must modify the following configuration options as follows:
- Activate sandbox: In the selector we will enter the option "No", so that we can receive real payments instead of tests.
- Payment action: We will select the option "Sale", which is the normal way of sale with PayPal
- Show PayPal benefits to your customers: It is advisable to select this part with the option "Yes", since if we activate it, when the client selects the payment method, he will always be able to view information about the advantages of paying with PayPal
- Shortcut Enabled: Here, we will enter the option "No", which is related to the activation of the PayPal express payment.
- Enabled in context: Here we will also enter the option "No".
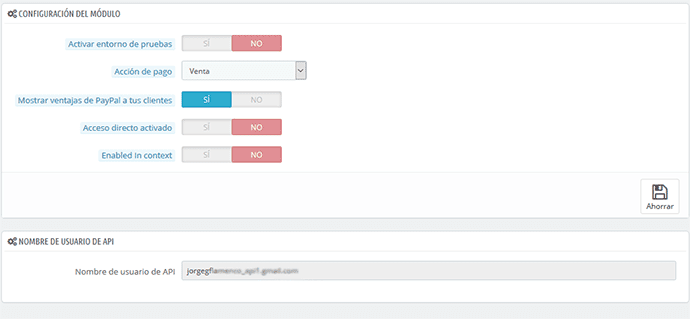
Once we have made these changes, we can press the "Save" button And so We will already have our PayPal module configured and connected with PrestaShop 1.7.
Want ribux